【L-RTK】RTK_スマホモニターPgm作り始めました<BlueTooth通信UBXシミュレータ作った>

フィールドでの測定で、リアルタイムに測定データを確認しながら観察するためにスマホでRTK MovingBase出力をモニターするプログラム作り始めました。

●ベースはProcessing KETAIライブラリーです。
Androidスマホのプログラミングは、AndroidStudioが普通なのですが、私は、JAVA落ちこぼれ人なので、いじれません、その代わり、JAVAベースで一般ユーザー向け言語Processingを使ってスマホプログラムを開発してきました。

●今まで作ってきたスマホプログラム
①スキー活動量計(2017~2018)
機能:スマホ内蔵センサ(加速度、気圧、GPS)のデータをログ表示
プログラム概要:Processing ketaiのMultipleSensorサンプルプログラムに
タッチUIを追加、
スマホログ中の誤操作防止仕様に苦労した

【AndroidPgm】Processingでスマホセンサ、IFを活用<Ketai凄い>

➁ロードバイク パワーマネジメントメーター(PMM2018)
機能:ロードバイクの自作パワーメーターのログをBlueTooth経由でスマホで表示ログするシステム(パワーメーター、風速センサ、心拍センサ、速度センサ全て自作)
プログラム概要:Ketai BlueToothでセンサデータを受信したが、割り込みタイミングでバッファエラーが多発でバグが治らず終わった。
=>BlueToothのバッファの制御ができてなかったみたいです。


【PMM2018】Processing_Android_modeでサイコン表示作った<ライブラリ無しで>

【PMM2018】タイミング割り込み系のバグ多発<Xbee Sleep未だ謎>

●RTK用スマホモニタープログラム開発の環境作り
①Processing Android Mode
Procesing自体は、PC上でIDEで動作します。ArduinoIDEとよく似た構造なので
ArduinoIDEを使ったことがある人なら簡単に使えます。JAVAというよりはC++に近い記述です。MSLABO様の入門記事から入るとよいです。
P
rocessingのandroidモードの入門はMSLABO様に教えていただきました。
こちらのブログが親切で丁寧です、質問にも丁寧に回答いただけます。
「Processingを Android端末で動かすには(4.0版)」

 Processingは、以前のバージョンのまま3.5.3を使ってます。スマホUTILITY用ライブラリーKETAIも入っているので、ライブラリー登録しておけば自由に使えます。KETAIのHPhttp://ketai.org/
https://processing.org/download/

➁BlueTooth送信用シミュレータ
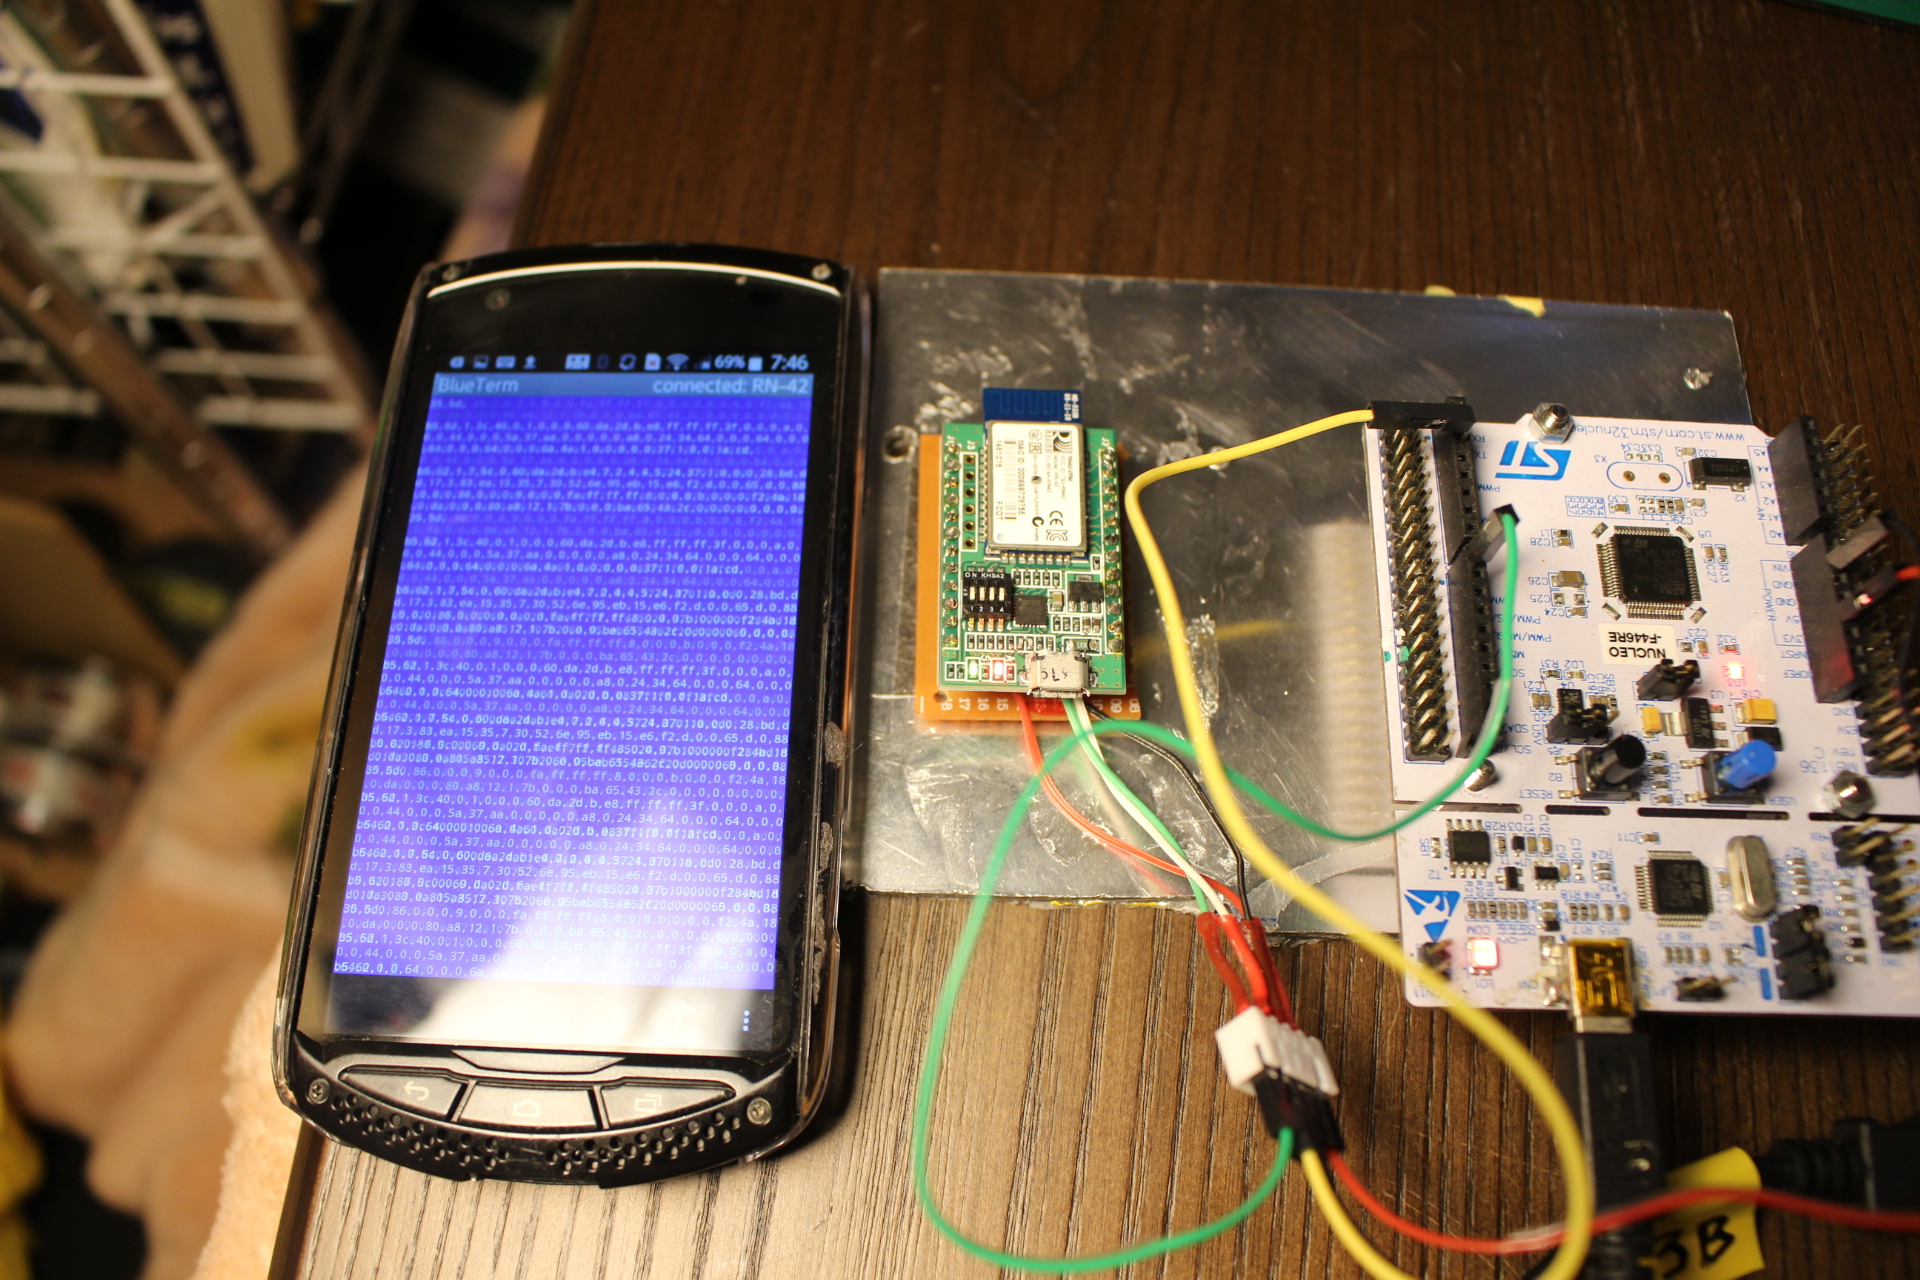
パワーメーターでBlueTooth受信でのバッファトラブルで敗退したことがあったので、対策として、BlueTooth送信シミュレータを作って、送信データ、速度、タイミングをシミュレートしながらデバッグして開発する環境を作りました。

MovingBase LUNCH-BOXに仕込んであるのと同じNUCLEO F446REでシミュレータ組みました。シリアルポートPA_9,PA_10とBluetoothモジュールRN42評価キットを接続しただけです。
●シミュレータプログラム概要
F9P出力の代わりに変数にUBX-NAV-PVT100バイト、UBX-NAV-RELPOSNED72バイトを
bDATA[]配列に定数定義してあります。
bData[]をPCとBlueToothに送信するだけのプログラムです。
■注意1:休みなしでBlueToothへ230400bpsで送信しているとスマホのバッファがオーバーしてフリーズしてしまいました。そこで、実際のF9Pの動作と同様に100msec休みをいれて、スマホのBlueToothバッファに余裕を持たせたら、連続送信でフリーズしなくなりました。以前ロードバイクパワーメーターでトラブルった件もこのバッファが問題でしたので、スマホのBluetToothで高速通信する場合は、休み休み使わないといけないみたいです。
■注意2:スマホモニタは、ログが目的でないため、UBXデータはバイナリ-なのですがASCIIに変換してCRLFまでつけて、BlueTooth送信してます。これは、スマホ側プログラムがASCII CRLF受信がデフォルトの設定なので、それに合わせました。
UBXの生ログは、バイナリーでLUNCH-BOX内のF446REのSDカードに保存しようと
思います。
mbed オンラインコンパイラでNucleoF446reでコンパイルすれば動作します。

#include “mbed.h”
#include “SDFileSystem.h”
Serial pc(USBTX,USBRX);
Serial F9P(PC_6,PC_7);;//F9P uart1 TX,RX-F446RE Serial6 TX,RX 5.62MHz
Serial BT(PA_9,PA_10);//Xbee TX,RX F446RE Serail TX,RX 5.62MHzDigitalOut myled(LED1);int i=0;
unsigned char c;
unsigned char bData[]={0xB5,0x62,0x1,0x7,0x5C,0x0,0x60,0xDA,0x2D,0xB,0xE4,0x7,0x2,0x4,0x4,0x5,0x24,0x37,0x1,0x0,0x0,0x0,0x28,_
0xBD,0xDD,0x17,0x3,0x83,0xEA,0x15,0x35,0x7,0x30,0x52,0x6E,0x95,0xEB,0x15,0xE6,0xF2,0xD,0x0,0x0,0x65,0xD,0x0,0x88,0x0,0x0,0x0,_
0x86,0x0,0x0,0x0,0x9,0x0,0x0,0x0,0xFA,0xFF,0xFF,0xFF,0x8,0x0,0x0,0x0,0xB,0x0,0x0,0x0,0xF2,0x4A,0x18,0x0,0xDA,0x0,0x0,0x0,0x80,_

0xA8,0x12,0x1,0x7B,0x0,0x0,0x0,0xBA,0x65,0x43,0x2C,0x0,0x0,0x0,0x0,0x0,0x0,0x0,0x0,0x35,0x5D,0xB5,0x62,0x1,0x3C,0x40,0x0,0x1,_
0x0,0x0,0x0,0x60,0xDA,0x2D,0xB,0xE8,0xFF,0xFF,0xFF,0x3F,0x0,0x0,0x0,0xA,0x0,0x0,0x0,0x44,0x0,0x0,0x0,0x5A,0x37,0xAA,0x0,0x0,_
0x0,0x0,0x0,0xA8,0x0,0x24,0x34,0x64,0x0,0x0,0x0,0x64,0x0,0x0,0x0,0x64,0x0,0x0,0x0,0x64,0x0,0x0,0x0,0x6A,0x4A,0x1,0x0,0x0,0x0,_

0x0,0x0,0x37,0x1,0x0,0x0,0x1A,0xCD};

int main() {
pc.baud(460800);
F9P.baud(460800);
BT.baud(230400);
while(1){
//if(F9P.getc()==0xb5){
//bData[0]=0xb5;

/*for(i=0;i<172;i++){
// pc.printf(“%x:%x\n\r”,i,bData[i]);
pc.putc(bData[i]);
}*/
for(i=0;i<172;i++){
//BT.putc(bData[i]);
if (bData[i]==0xb5 & bData[i+1]==0x62){
BT.printf(“\n\r”);
pc.printf(“\n\r”);
}
BT.printf(“%x,”,bData[i]);
pc.printf(“%x,”,bData[i]);
}
wait(0.1);
//}
}
}

●スマホプログラム作りProcessing Ketaiベース

機能 内容 課題、注意点
 BlueTooth受信 F9P LUNCH-BOXからのBlueToothSPP230400bpsを
スマホで受信して、UBX ASCII データ配列を抽出する
ハングしないように、余計な仕事をいれないようなLOOP構造にする
データ表示UI 受信開始タップ、受信停止タップ、保存オンオフタップなど
タッチUIとデータ更新モニターを作る
UIがつかいにくいとフィールドで失敗するので、使いながら改良が必要
ファイル保存 UBXのASCIIファイルを保存して、直後に呼び出してモニターできるようにする 読み書きUI いつの時点でファイルをFLUSH、CLOSEするかUIで決めるか自動FLUSHでいくか決める
軌跡ベクトル表示 上記UBXデータから緯度経度から軌跡、RELPOSNEDから相対変位でスキーの横滑り角をグラフィック表示する 保存データを呼び出して、その場で軌跡とベクトルチェックしやすいUIとグラフを作るが絵の構成が大変、座標軸の回転機能も必要なので1カ月かかるかも


いまのところの暫定BT受信部Processingプログラム

//required for BT enabling on startup

import android.content.Intent;
import android.os.Bundle;
import ketai.sensors.*;
import android.location.Location.*;
import ketai.net.bluetooth.*;
import ketai.ui.*;
import ketai.net.*;
PrintWriter output;
int j=0;
int k=0;
int np=0;//受信data連番 リングバッファ絶対値カウンタsampN=np%1500となる
int sampN=0;//累計サンプリング連番0-1499
int[] startN=new int[1500];//
int[] endN=new int[1500];//
PFont fontMy;
boolean bReleased = true; //no permament sending when finger is tap
KetaiBluetooth bt;
boolean isConfiguring = true;
String info = “”;
char[] pinfo=new char[100];
String p1=””;
//String ndata=””;
KetaiList klist;
ArrayList devicesDiscovered = new ArrayList();

//********************************************************************
// The following code is required to enable bluetooth at startup.
//********************************************************************

void onCreate(Bundle savedInstanceState) {
super.onCreate(savedInstanceState);
bt = new KetaiBluetooth(this);

}

void onActivityResult(int requestCode, int resultCode, Intent data) {
bt.onActivityResult(requestCode, resultCode, data);
}

void setup() {
String fileName = createFileName();
output=createWriter(fileName);
size(1340, 700);
frameRate(10);
// orientation(PORTRAIT);
orientation(LANDSCAPE);
background(0);

//start listening for BT connections
bt.start();
//at app start select device…
isConfiguring = true;
//font size
fontMy = createFont(“SansSerif”, 40);
textFont(fontMy);
}

void draw() {
//at app start select device
if (isConfiguring)
{
ArrayList names;
background(78, 93, 75);
klist = new KetaiList(this, bt.getPairedDeviceNames());
isConfiguring = false;
}
else
{
background(0,50,0);
if((mousePressed) && (bReleased == true))
{
//send with BT
byte[] data = {‘s’,’w’,’i’,’t’,’c’,’h’,’\r’};
bt.broadcast(data);
//first tap off to send next message
bReleased = false;
}
if(mousePressed == false)
{
bReleased = true; //finger is up
}
//print received data
fill(255);
noStroke();
textAlign(LEFT);
// string separation
text(info, 20, 104);
//println(info); // 8D
//output.println(info);

}
}

void onKetaiListSelection(KetaiList klist) {
String selection = klist.getSelection();
bt.connectToDeviceByName(selection);
//dispose of list for now
klist = null;
}

//Call back method to manage data received
void onBluetoothDataEvent(String who, byte[] data) {
if (isConfiguring)
return;
//char recieved
char [] cc = new char [data.length];
for (int i = 0; i < cc.length; i++) {cc[i]=(char) data[i];}
String s=new String(cc);
info=s;
// print(“inf0=”);
print(info);
for (j=0;j<cc.length;j++){
np++;
np=np%60000;
output.print(cc[j]);

}

}

// Arduino+Bluetooth+Processing
// Arduino-Android Bluetooth communication
String createFileName() {
String fileName=”//sdcard/DCIM/”+ nf(year(), 2) + nf(month(), 2) + nf(day(), 2) +”-“+ nf(hour(), 2) + nf(minute(), 2) + nf(second(), 2);
fileName += “.csv”;
return fileName;
}


UI部の暫定プログラム

/**
* <p>Ketai Sensor Library for Android: http://Ketai.org</p>
*
* <p>KetaiSensor Features:
* <ul>
* <li>handles incoming Sensor Events</li>
* <li>Includes Accelerometer, Magnetometer, Gyroscope, GPS, Light, Proximity</li>
* <li>Use KetaiNFC for Near Field Communication</li>
* </ul>
* <p>Updated: 2017-08-29 Daniel Sauter/j.duran</p>
*/
import android.content.Intent;
import android.os.Bundle;
import ketai.sensors.*;
import android.location.Location.*;
//import ketai.ui.*;
//import ketai.net.*;
//required for BT enabling on startup//import android.content.Intent;
//import android.os.Bundle;
//import ketai.sensors.*;
//import android.location.Location.*;
import ketai.net.bluetooth.*;
import ketai.ui.*;
import ketai.net.*;
//=========BT===================
int j=0;
int k=0;
int np=0;//受信data連番 リングバッファ絶対値カウンタsampN=np%1500となる
int sampN=0;//累計サンプリング連番0-1499
int[] startN=new int[1500];//
int[] endN=new int[1500];//
PFont fontMy;
boolean bReleased = true; //no permament sending when finger is tap
KetaiBluetooth bt;
boolean isConfiguring = true;
String info = “”;
char[] pinfo=new char[100];
String p1=””;
KetaiList klist;
ArrayList devicesDiscovered = new ArrayList();void onCreate(Bundle savedInstanceState) {
super.onCreate(savedInstanceState);
bt = new KetaiBluetooth(this);

}

void onActivityResult(int requestCode, int resultCode, Intent data) {
bt.onActivityResult(requestCode, resultCode, data);
}

//===========================================
KetaiList selectionlist;
KetaiVibrate vibe;
double longitude, latitude, altitude, accuracy;
KetaiLocation location;
Location uic;
KetaiSensor sensor;
PrintWriter output;
PVector magneticField, accelerometer;
float light, proximity;
float pres;
float sensorX, sensorY, sensorZ; //
float px,py,px_1,py_1;
String stat=””;
int pKey=0;
int n=0;
void setup()
{
fullScreen();

// Create a new file in the sketch directory
String fileName = createFileName();
output = createWriter(fileName);
sensor = new KetaiSensor(this);
sensor.start();
sensor.list();
accelerometer = new PVector();
magneticField = new PVector();
orientation(LANDSCAPE);
location = new KetaiLocation(this);
uic = new Location(“uic”); // Example location: the University of Illinois at Chicago
uic.setLatitude(41.874698);
uic.setLongitude(-87.658777);
//=================BT===================
bt.start();
isConfiguring = true;
fontMy = createFont(“SansSerif”, 40);
textFont(fontMy);

textAlign(CENTER, CENTER);
textSize(displayDensity * 20);
}

void draw()
{

int tim=0;
int tim_1=0;
background(78, 93, 75);
drawUI();
float relE=1;
float relN=1;
float relD=1;
text(“RELPOSNED :” + “\n”
+ “relE: ” +nfp(relE,3,1) + “cm\n”
+ “relN: ” +nfp(relN,3,1) + “cm\n”
+ “relD: ” +nfp(relD,3,1) + “cm\n”
+ “Location(GNSS) :” + “\n”
+ “Latitude= ” + nf((float)latitude, 3, 6) + “\n”
+ “Longitude= ” + nf((float)longitude, 3, 6) + “\n”
+ “Pressure : ” + nf(pres,4,4) + “\n”
+ “Log data N=: ” + nf(n,4,0) + “\n”
, 20, 0, width, height);
tim=millis();
//if (pKey==’s’){
stat=”Logging”;
output.println(nf(hour(),2,0)+”,” + nf(minute(),2,0)+”,” + nf(second(),2,0)+”,”+nf(tim,10,0)+”,”+nf(accelerometer.x,1,2)+”,”+nf(accelerometer.y,1,2)+”,”+nf(accelerometer.z,1,2)+”,”+nf((float)latitude,3,6)+”,”+nf((float)longitude,3,6)+”,”+nf(pres,4,2)+”,”+nf(relE,3,0)+”,”+nf(relN,3,0)+”,”+nf(relD,3,0)); // Write the coordinate to the file
n++;
// }
if (pKey==’x’){//Exit the program
output.flush(); // Writes the remaining data to the file
output.close(); // Finishes the file
this.getActivity().finish();
text(“Finished!”,0,0);
}
}
void onBackPressed() {
}

void onPressureEvent(float p)
{//: p ambient pressure in hPa or mbar
pres=p;
}
/* void onLocationEvent(Location _location)
{
//print out the location object
println(“onLocation event: ” + _location.toString());
longitude = _location.getLongitude();
latitude = _location.getLatitude();
altitude = _location.getAltitude();
accuracy = _location.getAccuracy();
}
*/

void onAccelerometerEvent(float x, float y, float z, long time, int accuracy)
{
accelerometer.set(x, y, z);
}
String createFileName() {
String fileName=”//sdcard/DCIM/”+ nf(year(), 2) + nf(month(), 2) + nf(day(), 2) +”-“+ nf(hour(), 2) + nf(minute(), 2) + nf(second(), 2);
fileName += “.csv”;
return fileName;
}

void onMagneticFieldEvent(float x, float y, float z, long time, int accuracy)
{
magneticField.set(x, y, z);
}

void onLightEvent(float v)
{
light = v;
}

void onProximityEvent(float v)
{
proximity = v;
}
void drawUI()
{
pushStyle();
textAlign(LEFT);
fill(0);
stroke(255);
rect(0, 0, width/3, 100);
rect(width/3, 0, width/3, 100);

rect((width/3)*2, 0, width/3, 100);

fill(255);
text(“KeyPressed=”+char(pKey), 5, 60);
text(stat, width/3 + 5, 60);
text(“ViewData”, width/3*2 + 5, 60);
popStyle();
}
void keyPressed() {
if (keyCode == BACK){
keyCode = 0;
key=char(pKey);
}
if (key==’s’){
pKey=’s’;
}
if (key==’x’){
pKey=’x’;
}
}
void mousePressed()
{
if (mouseY < 100)
{
if (mouseX < width/3)
{KetaiKeyboard.toggle(this);}
//else if (mouseX > width/3 && mouseX < width-(width/3))
//{KetaiAlertDialog.popup(this, “Pop Up!”, “this is a popup message box”);}
//else
//{vibe.vibrate(1000);}
}
}

//void mousePressed(){
//タッチされた座標を覚える
//px_1=px;
//py_1=py;
//px=mouseX;
//py=mouseY;
//output.flush(); // Writes the remaining data to the file
//output.close(); // Finishes the file
//}
//public void mousePressed() {
// if (sensor.isStarted())
// sensor.stop();
// else
// sensor.start();
// println(“KetaiSensor isStarted: ” + sensor.isStarted());
//}
/*
available sensors/methods

* void onSensorEvent(SensorEvent e) – raw android sensor event
* void onAccelerometerEvent(float x, float y, float z, long a, int b): x,y,z force in m/s^2, a=timestamp(nanos), b=accuracy
* void onAccelerometerEvent(float x, float y, float z): x,y,z force in m/s2
* void onOrientationEvent(float x, float y, flaot z, long a, int b): x,y,z rotation in degrees, a=timestamp(nanos), b=accuracy
* void onOrientationEvent(float x, float y, float z) : x,y,z rotation in degrees
* void onMagneticFieldEvent(float x, float y, float z, long a, int b) : x,y,z geomag field in uT, a=timestamp(nanos), b=accuracy
* void onMagneticFieldEvent(float x, float y, float z): x,y,z geomagnetic field in uT
* void onGyroscopeEvent(float x, float y, float z, long a, int b):x,y,z rotation in rads/sec, a=timestamp(nanos), b=accuracy
* void onGyroscopeEvent(float x, float y, float z): x,y,z rotation in rads/sec
* void onGravityEvent(float x, float y, float z, long a, int b): x,y,z force of gravity in m/s^2, a=timestamp(nanos), b=accuracy
* void onGravityEvent(float x, float y, float z): x,y,z rotation in m/s^s
* void onProximityEvent(float d, long a, int b): d distance from sensor (typically 0,1), a=timestamp(nanos), b=accuracy
* void onProximityEvent(float d): d distance from sensor (typically 0,1)
* void onLightEvent(float d, long a, int b): d illumination from sensor in lx
* void onLightEvent(float d): d illumination from sensor in lx
* void onPressureEvent(float p, long a, int b): p ambient pressure in hPa or mbar, a=timestamp(nanos), b=accuracy
* void onPressureEvent(float p): p ambient pressure in hPa or mbar
* void onTemperatureEvent(float t, long a, int b): t temperature in degrees in degrees Celsius, a=timestamp(nanos), a=timestamp(nanos), b=accuracy
* void onTemperatureEvent(float t): t temperature in degrees in degrees Celsius
* void onLinearAccelerationEvent(float x, float y, float z, long a, int b): x,y,z acceleration force in m/s^2, minus gravity, a=timestamp(nanos), b=accuracy
* void onLinearAccelerationEvent(float x, float y, float z): x,y,z acceleration force in m/s^2, minus gravity
* void onRotationVectorEvent(float x, float y, float z, long a, int b): x,y,z rotation vector values, a=timestamp(nanos), b=accuracy
* void onRotationVectorEvent(float x, float y, float z):x,y,z rotation vector values
* void onAmibentTemperatureEvent(float t): same as temp above (newer API)
* void onRelativeHumidityEvent(float h): h ambient humidity in percentage
* void onSignificantMotionEvent(): trigger for when significant motion has occurred
* void onStepDetectorEvent(): called on every step detected
* void onStepCounterEvent(float s): s is the step count since device reboot, is called on new step
* void onGeomagneticRotationVectorEvent(float x, float y, float z):
* void onGameRotationEvent(float x, float y, float z):
* void onHeartRateEvent(float r): returns current heart rate in bpm
*/

 ●以後
過去プログラムを合体すれば出きるのですが、忘却してしまっているので、動作させながら一歩一歩いくので最初から作るのとあまり変わらない時間がかかりそうです。
今回新たに挑戦するのは、グラフィックでスキー軌跡とベクトルをその場で表示する点が特に時間がかかりそうです。

コメントを残す

メールアドレスが公開されることはありません。 が付いている欄は必須項目です